之前有个想法,把自己日常收集和整理的文档整合起来,包括前端知识、环境相关(mac/服务器)、手写代码等。之前这些文档都存在 github 上,比较散乱。如果有个文档网页承接这些内容,不仅利于整理,有助于我平时阅览,也可以让更多人看到我的内容
为什么选 docusaurus?其实 gatsby 也可以做,但是 docusaurus 主要是做内容网页这一块,有很多开箱即用的功能,包括文档目录、自动生成导航栏、暗黑模式、docsearch、seo 支持等,gatsby 还需要额外引入一些插件来完成这些事,会比较麻烦点。其他方面其实都差不多,比如基于 react,支持 typescript、mdx 等等
这篇文章也主要总结下我在搭建过程遇到的一些经验,当然,目前只是个基础版本,欢迎 comment ~ Lucas’s docs
新建项目
注意:Node.js >= 16.14(node -v)。可以用 fnm 或 nvm 快捷切换 Node.js 版本
npx create-docusaurus@latest [项目名称] classic --typescript基本项目结构如下:
├── blog # 内置博客存放文档的位置,可以直接在这里存个人的博客文档。用不上博客的话直接删除就行了
├── docs # 内置文档存放的位置
├── src
│   ├── css
│   └── pages # 页面,此目录中的任何扩展名为 JSX/TSX/MDX 文件都将被转换为网站的独立页面
├── static # 存放静态文件
├── docusaurus.config.js # 网页配置文件
├── sidebars.js # 侧边栏,可以在这里指定侧边栏中的文档顺序或生成规则
├── package.json
├── README.md
└── yarn.lock
本地调试和打包
npm install
# 本地调试
npm start
# 生成静态文件
npm run build
配置
项目根目录会有这个文件 docusaurus.config.js,用于配置一些内置功能。可以参考我的这份配置:
const config = {
  // 网站标题
  title: "Lucas's Docs",
  tagline: "Dinosaurs are cool",
  // 网站图标
  favicon: "img/favicon.ico",
  // 网站网址
  url: "https://docs.zhouweibin.top",
  baseUrl: "/",
  organizationName: "facebook", // Usually your GitHub org/user name.
  projectName: "docusaurus", // Usually your repo name.
  onBrokenLinks: "throw",
  onBrokenMarkdownLinks: "warn",
  i18n: {
    defaultLocale: "en",
    locales: ["en"],
  },
  presets: [
    [
      "classic",
      /** @type {import('@docusaurus/preset-classic').Options} */
      ({
        docs: {
          sidebarPath: require.resolve("./sidebars.js"),
          // Please change this to your repo.
          // Remove this to remove the "edit this page" links.
          // editUrl:
          //   "https://github.com/facebook/docusaurus/tree/main/packages/create-docusaurus/templates/shared/",
        },
        // 不需要博客功能可以注释掉
        // blog: {
        //   showReadingTime: true,
        //   // Please change this to your repo.
        //   // Remove this to remove the "edit this page" links.
        //   // editUrl:
        //   //   "https://github.com/facebook/docusaurus/tree/main/packages/create-docusaurus/templates/shared/",
        // },
        // 自定义主题和样式
        theme: {
          customCss: require.resolve("./src/css/custom.css"),
        },
        // google搜索需要
        gtag: {
          trackingID: "G-G4NRSZR6K3",
          anonymizeIP: true,
        },
      }),
    ],
  ],
  themeConfig:
    /** @type {import('@docusaurus/preset-classic').ThemeConfig} */
    ({
      // 最左侧图标
      image: "img/docusaurus-social-card.jpg",
      navbar: {
        // hideOnScroll: true, 滚动时是否隐藏顶部栏
        title: "Lucas's docs",
        logo: {
          alt: "Lucas's Docs Logo",
          src: "img/logo.svg",
        },
        items: [
          // 顶部栏
          {
            type: "docSidebar",
            sidebarId: "awesome-dev",
            position: "left",
            label: "awesome-FED",
          },
          // 顶部栏图标配置,后面会讲到怎么设置图标
          {
            href: "https://github.com/GitHubJackson/my-docs",
            position: "right",
            className: "header-github-link",
            "aria-label": "GitHub",
          },
          {
            href: "https://mail.google.com/?view=cm&fs=1&tf=1&to=jacksonzhou52017@gmail.com",
            position: "right",
            className: "header-email-link",
            "aria-label": "Email",
          },
        ],
      },
      // 底部栏
      footer: {
        style: "dark",
        links: [
          {
            title: "Link",
            items: [
              {
                label: "Lucas's Blog",
                to: "https://blog.zhouweibin.top",
              },
            ],
          },
          {
            title: "Community",
          },
        ],
        copyright: `Copyright © ${new Date().getFullYear()} My Project, Inc. Built with Docusaurus.`,
      },
      // 主题配置
      prism: {
        theme: lightCodeTheme,
        darkTheme: darkCodeTheme,
      },
      // docsearch 后面会讲到,需要替换成自己的
      algolia: {
        appId: "xxx", // Application ID
        apiKey: "xxx", //  Search-Only API Key
        indexName: "lucas'docs",
      },
    }),
};

module.exports = config;
自定义样式和主题
在 src/css/custom.css 这里定义样式和主题色,可以点击 这里 快速配置和阅览效果
编写文档
直接在 docs 目录下新增 markdown 文件,默认会自动显示到侧边栏。文档顶部配置参考如下:
---
sidebar_position: 1    # 设置文档顺序,值越小越排前
title: Github Actions  # 文档标题。不设置的话默认以文件名或用#指定标题
description: desc      # 文档描述
tags:                  # 文档相关标签,会显示在文档末尾
  - tag1
  - tag2
---

正文...
更详细的参数参考 https://www.docusaurus.cn/docs/create-doc
侧边栏设置
可以调整 sidebars.js,更改侧边栏的选项和顺序
const sidebars = {
  // key 对应顶部栏,顶部栏会在下面讲到
  "awesome-dev": [
    {
      type: "autogenerated", // 根据文件夹内容自动生成,推荐这个配置
      dirName: "awesome-dev", // 该目录相对于docs目录,也就是在docs下新增一个文件夹
    },
  ],
};
module.exports = sidebars;
更多参考 https://www.docusaurus.cn/docs/sidebar
增加顶部栏
- 在
docusaurus.config.js > themeConfig增加选项,以new-tab为例:
// ...
themeConfig: {
  navbar: {
    title: "Lucas's docs",
    logo: {
      alt: "Lucas's Docs Logo",
      src: "img/logo.svg",
    },
    items: [
      {
        type: "docSidebar",
        sidebarId: "awesome-dev",
        position: "left",
        label: "awesome-FED",
      },
      {
        type: "docSidebar",
        label: "新栏目",
        sidebarId: "new-tab",
        position: "left",
      },
    ],
  },
}
// ...- 记得别忘了在
sidebars.js配置对应的侧边栏
const sidebars = {
  // key 对应顶部栏,顶部栏会在下面讲到
  "awesome-dev": [
    {
      type: "autogenerated", // 根据文件夹内容自动生成,推荐这个配置
      dirName: "awesome-dev",
    },
  ],
  "new-tab": [
    {
      type: "autogenerated",
      dirName: "new-tab",
    },
  ],
};
之后页面就会新增一个 new-tab 的顶部栏。那有时候只想加个图标,比如夜间模式切换图标和 github 图标,需要怎么实现呢?也不难,参考以下步骤:
- 在
docusaurus.config.js > themeConfig增加选项,以email为例:
// ...
themeConfig: {
  navbar: {
    title: "Lucas's docs",
    logo: {
      alt: "Lucas's Docs Logo",
      src: "img/logo.svg",
    },
    items: [
      {
        type: "docSidebar",
        sidebarId: "awesome-dev",
        position: "left",
        label: "awesome-FED",
      },
      {
        // email 自行搜索各邮件的接口格式,这里是 gmail,点击后会重定向到发邮件地址,收件人会自动填入我指定的地址
        href: "https://mail.google.com/?view=cm&fs=1&tf=1&to=jacksonzhou52017@gmail.com",
        position: "right",
        className: "header-email-link",
        "aria-label": "Email",
      },
    ],
  },
}- 定义图标,这里通过 css 加载图标
// src/css/custom.css
// ...
/* header-email-link */
.header-email-link:hover {
  opacity: 0.6;
}

.header-email-link::before {
  content: "";
  width: 24px;
  height: 24px;
  display: flex;
  background: url("data:image/svg+xml,%3Csvg class='icon' viewBox='0 0 1024 1024' xmlns='http://www.w3.org/2000/svg' width='200' height='200'%3E%3Cpath d='M854.016 342.016V256L512 470.016 169.984 256v86.016L512 554.026zm0-172.032q34.005 0 59.008 25.984t25.003 59.99v512q0 34.005-25.003 59.989t-59.008 25.984h-683.99q-34.005 0-59.007-25.984t-25.003-59.99v-512q0-34.005 25.003-59.989t59.008-25.984h683.989z' fill='%23444'/%3E%3C/svg%3E")
    no-repeat center;
  background-size: 100% 100%;
}

[data-theme="dark"] .header-email-link::before {
  background: url("data:image/svg+xml,%3Csvg class='icon' viewBox='0 0 1024 1024' xmlns='http://www.w3.org/2000/svg' width='200' height='200'%3E%3Cpath d='M854.016 342.016V256L512 470.016 169.984 256v86.016L512 554.026zm0-172.032q34.005 0 59.008 25.984t25.003 59.99v512q0 34.005-25.003 59.989t-59.008 25.984h-683.99q-34.005 0-59.007-25.984t-25.003-59.99v-512q0-34.005 25.003-59.989t59.008-25.984h683.989z' fill='%23cdcdcd'/%3E%3C/svg%3E")
    no-repeat center;
  background-size: 100% 100%;
}
图标是 svg 格式,但是需要做下转义,推荐个工具 https://www.zhangxinxu.com/sp/svgo/
文章多级分类
通过多层文件夹可以实现文章多级分类
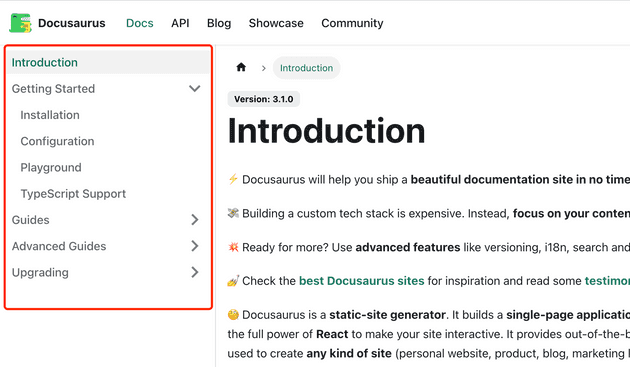
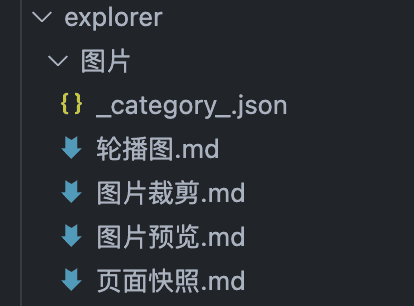
比如这里的 explorer 对应网页顶部的一个菜单,图片这个文件夹对应左侧的一级分类,下面的内容属于二级分类,参考下图。_category_.json 可以实现一个下图所示的父级分类卡片概览:
_category_.json 内容参考:
{
  "label": "Getting Started",
  "position": 1,
  "link": {
    "type": "generated-index",
    "description": "该分类的描述信息,在卡片概览上方显示"
  }
}
评论功能
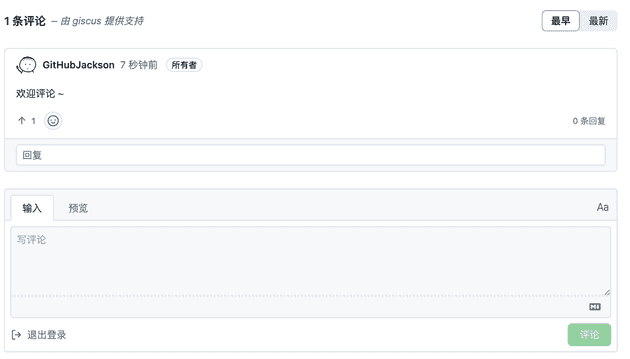
这个可以借助 giscus,需要先安装 giscus app
- 新增一个空的仓库用于承接评论信息(公开、启用 Discussions)
- https://giscus.app/zh-CN ,按照官网的步骤先做好配置,记住最后的代码片段(script 标签),后面会用到
- swizzling 对应的组件,默认文档组件是隐藏的,需要一次性导出,才能增加评论组件
yarn run swizzle @docusaurus/theme-classic DocItem/Layout -- --eject --typescript这条命令会生成文件 src/theme/DocItem/Layout/index.tsx,我们需要对其进行修改,改动内容参考以下代码:
// ...
  // 可以指定某些文档不允许评论,文章开头增加 hide_comment 配置即可
  const { hide_comment: hideComment } = frontMatter;
  const commentElement = useRef(null);
  useEffect(() => {
    // Update the document title using the browser API
    let s = document.createElement("script");
    s.src = "https://giscus.app/client.js";
    s.setAttribute("data-repo", "xxx");
    s.setAttribute("data-repo-id", "xxx");
    s.setAttribute("data-category", "Announcements");
    s.setAttribute("data-category-id", "xxx");
    s.setAttribute("data-mapping", "pathname");
    s.setAttribute("data-reactions-enabled", "1");
    s.setAttribute("data-emit-metadata", "0");
    s.setAttribute("data-input-position", "bottom");
    s.setAttribute("data-theme", "light");
    s.setAttribute("data-lang", "zh-CN");
    s.setAttribute("crossorigin", "anonymous");
    s.async = true;
    commentElement.current.appendChild(s);
  }, []);
  // ...
  return (
    // ...
    <DocItemPaginator />
    {!hideComment && <div ref={commentElement}></div>}
    // ...
  )
部署项目
简单点,其实就是在服务器划分一个文件夹存储网页的静态资源,用 nginx 配置端口和网页资源的映射关系,然后本地 build 生成静态资源后,通过 scp 把静态资源上传到服务器指定的一个目录下(或者用 ftp 可视化工具上传也行)。如果要搞提交代码后自动部署网页,内容可能稍微有点多,需要的话可以参考我之前写的一些文章:
- 购置服务器,配置
nginx,参考 文章 - 配置前端环境(Node.js>=16.14),参考 文章
- 自动化部署。借助
github actions完成代码提交后自动部署,搭建指南参考 Github Actions
添加文档搜索
既然是内容网页,高效的内容检索就很必要了。docsearch 这个功能放到这里说,是因为跟 github actions 有关
- 先到 官网 注册,大概两天后会收到邮件通知注册成功,再接着往下操作
- 登录
- 创建一个新的 Application,选择左边的免费版本进行下一步
- 定义
index_name,选择响应快的服务进行创建。到这一步就创建成功了 - 打开
API keys,获取三个需要的字段Application ID、Search-Only API key、Admin API key - 修改
docusaurus.config.js
// ...
themeConfig: {
  prism: {
    theme: lightCodeTheme,
    darkTheme: darkCodeTheme,
  },
  // 新增
  algolia: {
    appId: "xxx", // Application ID
    apiKey: "xxx", // Search-Only API Key
    indexName: "xxx", // index_name
  },
}
// ...
之后本地调试应该能看到 docsearch 的组件了
- 本地新增
docsearch.json配置文件,注意几个字段要替换成自己的
{
  // 需要替换
  "index_name": "xxx",
  // 需要替换。网站网址
  "start_urls": ["xxx"],
  // 需要替换。sitemap的网址,docusaurus 默认在根目录下生成 sitemap.xml
  "sitemap_urls": ["xxx"],
  "selectors": {
    "lvl0": {
      "selector": "(//ul[contains(@class,'menu__list')]//a[contains(@class, 'menu__link menu__link--sublist menu__link--active')]/text() | //nav[contains(@class, 'navbar')]//a[contains(@class, 'navbar__link--active')]/text())[last()]",
      "type": "xpath",
      "global": true,
      "default_value": "Documentation"
    },
    "lvl1": "header h1, article h1",
    "lvl2": "article h2",
    "lvl3": "article h3",
    "lvl4": "article h4",
    "lvl5": "article h5, article td:first-child",
    "lvl6": "article h6",
    "text": "article p, article li, article td:last-child"
  },
  "custom_settings": {
    "attributesForFaceting": [
      "type",
      "lang",
      "language",
      "version",
      "docusaurus_tag"
    ],
    "attributesToRetrieve": [
      "hierarchy",
      "content",
      "anchor",
      "url",
      "url_without_anchor",
      "type"
    ],
    "attributesToHighlight": ["hierarchy", "content"],
    "attributesToSnippet": ["content:10"],
    "camelCaseAttributes": ["hierarchy", "content"],
    "searchableAttributes": [
      "unordered(hierarchy.lvl0)",
      "unordered(hierarchy.lvl1)",
      "unordered(hierarchy.lvl2)",
      "unordered(hierarchy.lvl3)",
      "unordered(hierarchy.lvl4)",
      "unordered(hierarchy.lvl5)",
      "unordered(hierarchy.lvl6)",
      "content"
    ],
    "distinct": true,
    "attributeForDistinct": "url",
    "customRanking": [
      "desc(weight.pageRank)",
      "desc(weight.level)",
      "asc(weight.position)"
    ],
    "ranking": [
      "words",
      "filters",
      "typo",
      "attribute",
      "proximity",
      "exact",
      "custom"
    ],
    "highlightPreTag": "<span class='algolia-docsearch-suggestion--highlight'>",
    "highlightPostTag": "</span>",
    "minWordSizefor1Typo": 3,
    "minWordSizefor2Typos": 7,
    "allowTyposOnNumericTokens": false,
    "minProximity": 1,
    "ignorePlurals": true,
    "advancedSyntax": true,
    "attributeCriteriaComputedByMinProximity": true,
    "removeWordsIfNoResults": "allOptional",
    "separatorsToIndex": "_",
    "synonyms": [
      ["js", "javascript"],
      ["ts", "typescript"]
    ]
  }
}- 增加
.github/workflows/docseach.yml,在提交代码后提醒 algolia 服务更新本站资源。注意:需要先新增两个 key:ALGOLIA_APP_ID和ALGOLIA_API_KEY,分别对应Application ID和Admin API key
name: docsearch

on:
  push:
    branches:
      - main

jobs:
  algolia:
    runs-on: ubuntu-latest
    steps:
      - uses: actions/checkout@v2

      - name: Get the content of docsearch.json as config
        id: algolia_config
        run: echo "::set-output name=config::$(cat docsearch.json | jq -r tostring)"

      - name: Run algolia/docsearch-scraper image
        env:
          ALGOLIA_APP_ID: ${{ secrets.ALGOLIA_APP_ID }}
          ALGOLIA_API_KEY: ${{ secrets.ALGOLIA_API_KEY }}
          CONFIG: ${{ steps.algolia_config.outputs.config }}
        run: |
          docker run \
            --env APPLICATION_ID=${ALGOLIA_APP_ID} \
            --env API_KEY=${ALGOLIA_API_KEY} \
            --env "CONFIG=${CONFIG}" \
            algolia/docsearch-scraper
SEO 相关
生成站点地图。docusaurus 在 build 时默认会创建 sitemap.xml,存放在打包文件夹根目录下。之后可以上传到 谷歌/bing/百度的站长管理平台,只需上传一次,后面他们都会定时去更新(不过最近几个月百度都没法上传 sitemap 了,一整个无语住了,有了解的同学可以 comment 下..)
在每篇文章开头补充详细的 keywords 和 description,也有利于搜索引擎检索
google analytics
可以分析你网站的运行情况,比如访问量、用户属性等,然后可以检查自己的网页有没有被检索,没有的话可以主动请求编入索引(当然,需要你的文章内容过关,并且适合用于移动网页)
添加教程参考 添加帐号。在 docusaurus 中使用 google analytics 需要用到插件 plugin-google-gtag
npm install --save @docusaurus/plugin-google-gtag在 docusaurus.config.js 追加 gtag 配置如下:
// ...
presets: [
  [
    "classic",
    ({
      // ...
      gtag: {
        // 从 google analytics 账号中获取
        trackingID: "xxx",
        anonymizeIP: true,
      },
    }),
  ],
],
robots.txt
放在 static 目录下即可,build 后会在网页根目录下。如果没有限制搜索引擎访问某些网页的需求,那直接用下面的内容就行了## 文章多级分类
通过多层文件夹可以实现文章多级分类
比如这里的 explorer 对应网页顶部的一个菜单,图片这个文件夹对应左侧的一级分类,下面的内容属于二级分类,参考下图。_category_.json 可以实现一个下图所示的父级分类卡片概览:
_category_.json 内容参考:
{
  "label": "Getting Started",
  "position": 1,
  "link": {
    "type": "generated-index",
    "description": "该分类的描述信息,在卡片概览上方显示"
  }
}
User-agent: *
Disallow:自定义组件
待补充…
更多插件
待补充…
写在最后
有疑问或建议欢迎 comment.


