在智驾场景里,元素的坐标数据可能基于自车坐标系(自车不动)或者原点坐标系(自车动)。为了简单点,autopilot 先基于原点坐标系来 mock 道路和障碍物等,然后回基于 tween 来做行驶的动画演示,既然是原点坐标系,那意味着自车需要实时更新位置信息和偏转方向,所以就需要实现跟车相机
跟车相机
跟车相机朝向约定为 x 轴正向和 y 轴正向,这样在俯视视角正符合二维坐标轴的情况,便于后面 mock 行车的数据
camera.up.set(0, 0, 1);
camera.position.set(-4, -0.4, 1.4);
自车 Group
这里先将自车携带的元素加到一个 Group里,比如车灯、扩散光环等,便于在自车更新位置和朝向的时候统一更新
export default class EgoCar {
  group = new THREE.Group();

  loadEgoCar() {
    const loadEgoCar = abortWrapper(
      loadDracoGLTFWithPromise(carModelWithDraco)
    );
    return loadEgoCar.then((gltf) => {
      const car = gltf.scene;
      car.scale.set(0.1, 0.1, 0.1);
      car.rotateX(Math.PI / 2);
      car.rotateY(-Math.PI / 2);
      // 车灯和扩散光环类似,通过group.add加入
      this.group.add(car);
      this.scene.add(this.group);
    });
  }
}
lookAt
在渲染循环里动态更新相机位置,始终位于相机后上方,用 lookAt 让相机始终朝向目标,然后用 tween 模拟一段向前行驶的动画
// ...
const egoCar = new EgoCar(scene);
this.camera.lookAt(egoCar.group.position);
// ...
function animate() {
  controls.update();
  camera.position.x = egoCar.group.position.x - 5;
  camera.position.y = egoCar.group.position.y - 0.4;
  camera.lookAt(egoCar.group.position);
  renderer.render(scene, camera);
}
// ...
// 模拟向前行驶
runEgoCar() {
    if (this.egoCar) {
      const animate = new Tween(this.egoCar.group.position)
        .to({ x: 10, y: 0, z: 0 }, 5000)
        .easing(Easing.Quadratic.InOut)
        .start();
      setInterval(() => {
        animate.update();
      }, 50);
    }
}但这里后发现OrbitControls并不能正确转动了,因为在渲染循环里动态改了相机位置,导致控制相机也始终固定在相机那个位置
camera.position.x = egoCar.group.position.x - 5;
camera.position.y = egoCar.group.position.y - 0.4;
这里可以尝试加一个 fakeCamera 作为控制器的辅助相机,camera 始终与其同步,比如旋转相机时更新相机的顺序:fakeCamera > camera,然后再根据自车运动距离进一步更新相机位置,并且可以把更新相机的函数抽出来
// ...
function updateCamera() {
  const position = egoCar.group.position;
  // 将 fakeCamera 的属性同步给 camera
  camera.copy(fakeCamera);
  const x = fakeCamera.position.x;
  const y = fakeCamera.position.y;
  // 相机和自车保持一个固定的偏移
  camera.position.x = position.x + x;
  camera.position.y = position.y + y;
}
function animate() {
  updateCamera();
  controls.update();
  renderer.render(scene, camera);
}
转向
一般情况下可以从规控数据中拿到自车偏转角 yaw,可以转成 x/y 轴平面的弧度值。同样这里先用 tween 模拟一下自车转向,需要加多几组动画。这里怎么统一更新 tween 动画?类似于 THREE.Group,tween 也支持 Group,可以统一管理一组动画的更新,在旧版本的 tween 可以直接用 TWEEN.update,新版已经标记为弃用了
const tweenGroup = new TWEEN.Group();
// ...
const animate = () => {
  this.updateCamera();
  // 统一更新动画
  tweenGroup.update();
  this.controls!.update();
  this.renderer.render(scene, camera);
};
// ...
runEgoCar() {
    if (this.egoCar) {
      const animate2 = new Tween(this.egoCar.group.position)
        .to(
          {
            y: -0.5,
          },
          2000
        )
        .start();
      const animate = new Tween(this.egoCar.group.position)
        .delay(500)
        .to(
          {
            x: 10,
          },
          5000
        )
        .easing(Easing.Quadratic.In)
        .start();
      const rotationAnimate = new Tween(this.egoCar.group.rotation)
        .to(
          {
            z: -Math.PI / 4,
          },
          1200
        )
        .start()
        .onComplete(() => {
          const rotationAnimate2 = new Tween(this.egoCar!.group.rotation)
            .to(
              {
                z: 0,
              },
              1600
            )
            .start();
          tweenGroup.add(rotationAnimate2);
        });
      tweenGroup.add(animate, animate2, rotationAnimate);
    }
  }
更新自车转向的时候,相机也应该有一个同样的偏转,目标就是让相机能和自车保持相对静止。这里主要就是做一些正余弦计算来获取更新后的相机位置,计算逻辑参考代码:
const fakeCameraDirection = new THREE.Vector3();
// ...
updateCamera = () => {
  // 将 fakeCamera 的属性同步给 camera,也就是旋转或缩放场景后更新的相机属性
  this.camera.copy(this.fakeCamera);
  const position = this.egoCar.group.position;
  const rotation = this.egoCar.group.rotation;
  const x = this.fakeCamera.position.x;
  const y = this.fakeCamera.position.y;
  // 获取相机视线的方向向量
  this.fakeCamera.getWorldDirection(fakeCameraDirection);
  // 计算相机方向在xy平面上的弧度值
  const directionTheta = Math.atan2(
    fakeCameraDirection.y,
    fakeCameraDirection.x
  );
  const camera2egocarDistance = Math.sqrt(x * x + y * y);
  this.camera.position.x =
    position.x - camera2egocarDistance * Math.cos(rotation.z + directionTheta);
  this.camera.position.y =
    position.y - camera2egocarDistance * Math.sin(rotation.z + directionTheta);
  this.camera.lookAt(position.x, position.y, position.z);
};
更新视角
主要是跟车视角和俯视视角的切换,或者可以记住用户自定义的视角。这里先看下怎么支持做这个切换,之前其实简单加过一版视角切换,但因为我们新增了 fakeCamera 所以这里要更新下实现逻辑
// src/renderer/index.ts
// ...
switchCameraView(view = EViewType.FollowCar) {
    this.cameraView = view;
    switch (view) {
      // 跟车
      case EViewType.FollowCar: {
        this.resetFakeCamera();
        this.fakeCamera.position.set(-4, -0.4, 1.4);
        break;
      }
      // 俯视横向
      case EViewType.Overlook: {
        this.resetFakeCamera();
        this.fakeCamera.position.set(0, 0, 20);
        break;
      }
      // 俯视纵向
      case EViewType.OverlookVertical: {
        this.resetFakeCamera();
        this.fakeCamera.position.set(0, 0, 20);
        this.controls.rotate(Math.PI / 2);
        break;
      }
      default:
        break;
    }
}
但是新版的 controls 没有直接暴露 rotate 方法,因为我之前用的 three 旧版本有提供这个方法,可以很方便地改变控制相机的方向,暂时还没找到平替的方法(知道的大佬可以帮忙解答一下 thx~ three 官方也有相关issue和issue2)这里我先直接改的源文件,增加了一个 rotate 方法,文件位置在src/helper/three/OrbitControls.js,然后再重新引入
// src/helper/OrbitControls.js
// ...
this.rotate = function (degrees) {
  rotateLeft(degrees);
  this.update();
};
// src/renderer/index.ts
import { OrbitControls } from "../helper/three/OrbitControls.js";
观察相机
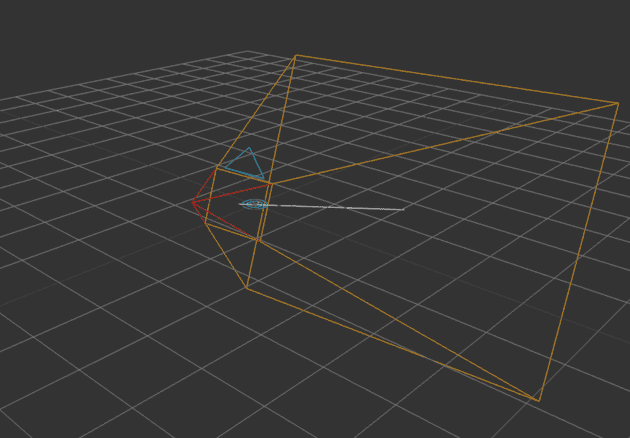
需要一个辅助相机,然后借助 CameraHelper来观察我们正在用的透视相机
// 辅助相机
const camera2 = new THREE.PerspectiveCamera(45, width / height, 0.01, 1000);
camera2.position.set(-10, -5, 4);
// camera2.lookAt(0, 0, 0);
camera2.up.set(0, 0, 1);
// 观察原有相机
const cameraHelper = new THREE.CameraHelper(camera);
scene.add(cameraHelper);
const controls = new OrbitControls(camera2, renderer.domElement);
this.controls = controls;
const animate = () => {
  // ...
  this.renderer.render(scene, camera2);
};
PerspectiveCamera(fov: number, aspect: number, near: number, far: number)可以调节相机参数直观地看看效果,这里也可以换成正交相机试试
- fov — 摄像机视锥体垂直视野角度
- aspect — 摄像机视锥体长宽比
- near — 摄像机视锥体近端面
- far — 摄像机视锥体远端面

